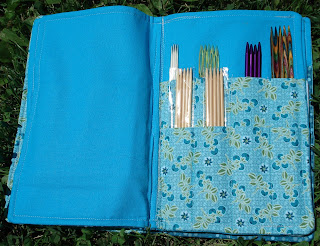
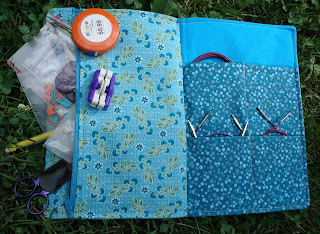
I finished my needle case yesterday! :) I'm pretty excited about this. Now I can actually put all my needles, cables and notions in it and put away the less-than-attractive case my needles came in. I took lots of pictures - just to warn you. I'll try to be selective, but sometimes I just can't help myself. And since it's my blog, I won't apologize. :)
I'm calling my case my KnitBook, mainly because it's comprised of 6 pages. Each page has at least one type of pocket attached to it. I made my book by sewing 3 longer pages and then attaching them at the middle. Then, when I'm looking for my needles, I can flip through the pages like I'm flipping through a book. :)
Page 1 is the cover and a large notions pocket (still my favorite part of the entire case!!) and page 2 consists of 10 pockets of varying sizes to hold my KnitPicks Harmony & Nickel-plated Interchangeables. The notions pocket can hold a variety of items and still not get too bulky for the case.
Page 3 has 6 pockets, also for KnitPicks Options needles.
Page 4 has 8 pockets for varying sizes of DPNs. Or straight needles if I ever buy any... These pockets can hold needles up to 9 inches in length.
Page 5 would be 6 pockets for DPNs or straight needles. Obviously, I don't have enough needles at this point to fill the entire case. I'll get there at some point. :)
The final page, page 6, holds my cables and circular needles. I only have a couple circs, and if I get more they will be in smaller sizes since I have my KP Options needles. But these pockets are great for my cables - just deep enough to easily hold them, and yet I can pull one out when needed without losing it in the pocket.
The only part of this case that
really gave me any trouble is attaching the pages to one another. Because of all the interfacing and lining, the seams were thick. My original plan was to sew a secure line down the center of the pages, attaching them to one another. I tried this, several times. I ripped out abot 4 seams. I had shown my mom the case at one point, while I had everything sewn up. She helped me problem solve until we had an idea of what might work.
Instead of using the regular pressure foot, I used my zipper foot and sewed a line down each side of the middle seams, where the fabric was the thickest. This worked a lot better! Thanks, Mom! :) (A tip she gave me for future projects, cut the interfacing just a bit smaller than your fabric - when your seams are sewn, no interfacing will be sewn into the seam allowance - eliminating some of the bulk!)
Anywho - I'm happy with how it turned out. It's filled with my needles, and now I can move on to my next project! :)


