Monday, May 31, 2010

Cluck, Cluck!

Do you remember this little chick?  I got her in the mail as part of an Easter swap package. 
I'm pleased to announce that she now has a sister! :) 
I finally finished up the Dotted Chicken I've had in my queue for a long time now.  Melissa included all the yarn to make this little chick in the package, so I didn't have to do any work except for knit up the toy.
 I decided to use the dark blue for the ruffle, beak and tail bobbles.  The dark color is very striking against the cream colored body. 
This knit is very quick.  I started it on Friday and between a few tv shows, a car ride or two and this morning I had her all sewn up. 
 The tail, the dots and the details probably took me the longest.  After making 13 little dots to place on the chicken I found them a little tedious.  Last night I was close to done - all I had to do was finish the dots and sew them on.  I quickly ran out of steam, though, and put the project down for the night.  This morning I was able to finish up and sew them on.

The finished product is great.  She's short and plump, just like a chicken should be. Before her ruffle and beak were on her head was looking very tiny in contrast to her body.  But now she looks appropriate.

Here's a picture with her Canadian sister.  I think they'll enjoy their perch on the shelf together. Every now and then they may come down and play with X - he loves little animals. :)
As a side note, this is the first timeI've used any poly-pellets in my toys.  Melissa had these stitched up nicely in a little pouch so there's no choking hazard.  I plan to use pellets more often in the future.  They had a nice weight to the toy.  While not necessary in everything, the option is there.

Done and Done

Last post I mentioned I was able to use my Reading Mitts while spending time in my chilly basement.  They worked so well.  And now, I've got stacks of cut fabric to show for it! :) (Well - now it's in the mail, hopefully arriving at it's destination tomorrow...)

Just a couple pictures of all the lovely squares....

Friday, May 28, 2010

What A Busy Day!

I took the day off from work today.  Although the school year is coming to an end teachers are done on Tuesday), I work through the summer.  I thought with the extra day on the holiday weekend (Memorial Day is Monday for those of you not from the US), I should use some of my vacation time!
With my time off, I took the opportunity to work on some items on my to-do list. First, I finished up the very last little bit of my Reading Mitts. After taking X to daycare this morning I came back and sewed up the turning round on the second mitt.  Last night on our way to supper with my mom, I finished up most of it in the car.  It felt good to start and finish a project for myself, and since this was a small project, it was some good instant gratification.
These mitts are knit with KnitPicks Elegance, in the jade colorway.  Inside, this yarn looks like a dark heathery green.  But in the sunlight, the green is very vibrant and gem-like. :)
There is a lace pattern both at the bottom and the top of the mitts.  There is 1 row of open lacework combined w/ a few knit & purl rows to create some texture.
The patterns says to knit the St.st. rows for 5 inches, but I wanted them just a tiny bit longer until they measured 5 1/2 inches. 
And tried as I might, I couldn't figure out a way to take pictures of them while I was wearing them.  So instead, my husband was kind enough to take a few pictures and indulge me when I kept asking him to take more. 
Even better, I got to use the mitts today!  I was a little sad that after I made these I wasn't going to be able to use them for awhile since summer is just around the corner and the warm weather is really setting in full force.  Part of what I did today with my time was to finish cutting I-Spy squares

Now - when I do my sewing, I am in our basement.  We have a finished basement with a couch and tv, our computer room is downstairs.  My craft corner, folding table and sewing machine are all tucked away while they wait for me to use them. :)  Downside to all this?  It's freezing in our basement, especially when the air is running. The solution - my Reading Mitts!  And since they're fingerless gloves, they're perfect for working on other things while wearing them - unlike regular gloves or mittens which hinder any semblence of hand-eye coordination I'm capable of useless....

I was very happy to have my new mitts to keep me warm. And now....my mitts are done, my squares are cut and I've even had the chance to start on my next project - a Dotted Chicken!  :) This should be pretty fast.  Next on my sewing list will be a needle case. :)

Tuesday, May 25, 2010

I-Spy With My Own Eye

A little while ago I decided to deviate from the norm and participate in a new kind of swap (who can resist when you can exchange so many fun things!).  This time, it's a fabric swap.  My friend, Melissa, at Knitting a Baby told me about this one. You can see more about the swap HERE at Obsessively Stitching.

The rules are pretty simple.  Cut and swap 200 4" squares of fabric.  Wow, that sounds daunting, doesn't it?  It's not really, if you think about how small a 4" square is.  And okay, maybe I simplified the rules just a tiny bit. 

The requirementss:
1. Cut 20 4" squares out of each of 10 different novelty print fabrics. A 1/4 yard or fat quarter should easily get 20 squares.  Unless you're like me, and you choose larger objects to "spy."  Then it takes more yardage because you have to think about picture placement.  No one wants a picture of a panda's rear-end to spy. :)  (Picture must fit in 3 1/2" square)
2. Pick fun fabrics that aren't your run-of-the mill patterns.  No licensed prints. 
3. Mail out to be received by June 4th, get different squares back from swap! 

I've got about half of my squares cut.   I need to go back for more fabric since a few of my prints I was unable to get 20 squares.  I'm hoping to get that done tonight so I can have the squares mailed out by the end of the week.

Now, in case you haven't figured it out yet, the point of these fabric squares is to have a whole bunch of pictures of different objects.  Then you can play "I-Spy."  I understand this sounds like something more for kids, but it could be entertaining for adults as well. :)

Once I get my swap package full of fun I-Spy squares, I plan to make a Disappearing 9-Patch Quilt for X with it.  (There is a great tutorial HERE.) He's at the age where he points at EVERYTHING and wants you to name it.  And he's really beginning to mimic words.  Right now his favorite word and object to point at is a star.  Any star, anywhere.  He'll find it and show it to you.  And since his bedroom is covered in stars, we have a lot of fun in there pointing them all out.  Other words right now include: mamma, dada, juice, dog/Jax, binky (or at least his version of binky), more and star.  What better practice for him to learn the names of things than an I-Spy quilt.  Made for him with love by Mommy. :)

In the meantime- I've been working on my Reading Mitts (pattern is Susie's Reading Mitts).  I finished the first one quickly and I'm about half-way through the second.  I've decided that although I'll enjoy the finished results, it bothers me when I have 2 of something.  It's irrational sometimes - like when knitting fingerless gloves or socks or something - I guess after the first one is finished I feel like both should magically be done!  This won't keep me from choosing projects such as gloves or toys w/ several of the same thing - I just noticed last night that I was haboring a bit of resentment against the second mitt since it wasn't finished!

Monday, May 24, 2010

Swap Complete

Wow, it's been a long weekend...even though it felt like Monday came too early, I spent the weekend fending off a cold or some kind of bug. :( Being sick stinks. :(

Anywho, I'm finally back to put up some more pictures and share more about the most recent swap I've been talking about lately. (Warning - I got a bit wordy today so the post is a little long.)

Last week I showed you the notions bag and needle case.  Today, I thought I'd show you the knit items - Frenchie and two pairs of Jelly Bean Baby Socks (see second pair HERE). :)  Let's start with Frenchie. Although I thought this hat was cute, it's probably not one I would have knit had I not participated in the swap.  I don't know why - it just wasn't grabbing me.  But after knitting it, I have to admit that it surprised me.
With all the variation in colors and stitch patterns, it held my interest.  Sometimes, a hat is so simple because it's just row after row of stockinette stitch.  Not that such a thing is bad - in fact it makes for a nice base of a hat, but sometimes, when you're looking for something a little more creative or challenging, it can feel like it's taking forever to finish.  Back to this hat.  My favorite part is the top, where it starts to narrow into a little cone.  The color contrast between the light and dark blues appeals to me and peaks my interest. 
The most tedious part of the hat?  The wrapped "wave" embellishments near the bottom.  I like the finished look, but after wrapping 2 rows of chain stitch waves, I'm ready to not do that again for awhile.  Part of it was my fault because I put in smaller waves, which also meant more waves.  I liked the chain stitching before it was wrapped, but I don't like not completing part of the original design, especially since I wasn't keeping this hat for X.
This time I used the same colors as the pattern called for.  I usually like to put my own spin on the colors - see what draws me in.  Originally, I looked for a rusty orange to substitute for the yellow, but I never found one I really liked, and I didn't want to wait to order more yarn in the mail since most of what was used I found in my stash.
Moving on to the socks.  This was my first time knitting socks - or footwear of any kind. These were really easy and quick - especially since the pattern calls for worsted weight yarn.  I was making socks for an older boy, not a baby, so I cast on for the largest size and just adjusted the length according to his foot measurements.  I've since heard that they fit well, with just a tiny bit of room to grow, so they should last him through the colder weather in Australia. :)
I knit the first pair with Spud & Chloe Sweater in Moonlight.  I thought they would look nice with the hat. 
When I finished that pair, I debated for a long time whether to make a second pair.  They were so fast, though, that I went ahead and made some from the lighter blue, Nymp yarn (Brown Sheep Cotton Fleece).  The second pair were that much easier.
The remainder of what was included in the swap were all the goodies.  To stay true to the Parisian theme, I found several goodies on Etsy, including some Parisian swing tags I attached to the knit items, a moleskin notebook, an Eiffel Tower pendant/keychain, and spring-inspired stitch markers. I love those stitch markers.
And what's a swap package without some yarn?  I included 2 hanks of Spud & Chloe in Firecracker. 
When I was shopping for goodies, I discovered Fareway was having a sale on KoolAid so I stocked up - for myself, and for Mel.  They were 10/$1.  I think I got 30-40 packets.  I can't quite remember. 

And not wanting her kids to miss out (since I knew they liked the KoolAid but only got to drink the invisible stuff) I picked up a larger container of Invisible KoolAid they could share. 

I found a book that had several Golden Books classics all included in one for Mel's youngest son.
As well as some party favor toys for them all to share including mini Etch-a-Sketch pads and Slinky Dogs from Toy Story. 
And to include a little bit of Iowa, I threw in a deck of John Deere playing cards.  Since John Deere is pretty prevalent in our little farming state, I thought it was appropriate.
I really enjoyed putting this swap together.  I got to be creative in several ways - knitting, sewing, seeking out the great goodies, not to mention being creative to fit it all into the box! :)

Thursday, May 20, 2010

Patient? Not So Much...

Have I ever mentioned on the blog that I'm not a very patient person sometimes?  I think I have, but just in case, I'll say it again.  I'm not a very patient person.  Unless I HAVE to be.  Such is the case with any swap I participate in.  Don't get me wrong, I love being a part of them, and I love the anticipation of waiting for a package and then opening it once it has arrived.  It's so fun to open something knowing it was put together especially for you!  I encourage everyone to try it at least once.

Okay, back to the point...the nature of the swap is that it's a secret who you're making things for, as well as what goodies you choose to include in the package.  So when I'm knitting or making items, it kills me to have to keep it a secret until the recipient gets her package!!  That's why I like to share teaser photos...I don't get so antsy waiting to share.

And this time around, since my swap partner was Mel (womaninashoe) and she organizes the swaps, she knew I had her name.  So I REALLY couldn't share a lot of information!!!  Anywho - she has now received her package and I can share all the goodies.  Today I'm only going to expand upon the sewn items I included.  Hopefully, tomorrow I'll have the chance to post more about the swap.

I have been itching to sew more items.  But every time I think I will, I get caught up in knitting.  I don't really mind, though.  This swap gave me the opportunity to focus on sewing.  I even had the time to sew 2 items! :)  The first, was a project bag...well more of a notions bag to include in a project bag really.  I don't think it could hold very much by way of yarn and a project unless it was REALLY small. 
I used some light offwhite fabric with a very springtime feel to it.  Little blue birds danced around this little bag.  I love this fabric.  It says "delicate" to me.  It's a simple, lined drawstring pouch. 
The second item was a mini needle case.  Just enough room to hold a few needles/dpns, circs, interchangeables and their cables - whatever you'd like to include in your project bag without having to tote ALL your needles along.  And they're kept safe and secure. 
This was my first time making a needle case and now I can't wait to make my own.  The exact dimensions escape me at the moment, but it's something like 6" x 10" or something like that. 
The case snaps closed with a pearl snap.  This flap also acts to keep all the needles tucked safely away inside.
There are 3 lined pockets about 6" deep to store needles of any sort (w/in reason).  There is also one larger pocket below to hold circs, interchangeable cables, a small pair of scissors, anything like that.  It is also just deep enough to hold KnitPicks tips. 
I chose the fabric to compliment the swap theme of Springtime in Paris.  This fabric shows a "cityscape" of several different famous monuments and locations, including......you guessed it....the Eiffel Tower. :)  (it also included the Statute of Liberty, Big Ben, the Leaning Tower of Pisa (I think...) along with several others)
All the pockets are lined and I used a double layer of interfacing so that needle points don't poke out and the needles are sure to be supported and secure.  I considered adding batting, but I wanted it to be slim and trim, and I thought that might add too much bulk.

I hope Mel gets some use out of the case.  It was my favorite item in the entire swap package.  I was SOO tempted to keep it for myself.  :) But now I've done it once, so I can do it again! :)

Tuesday, May 18, 2010

Dyeing Wool

I finally tried dyeing wool.  Little man cooperated the other night by falling asleep for an unexpected nap, which lasted about 2.5 hours!  Plenty of time to experiment with a little bit of Koolaid & Jell-O!

At the time I dyed the yarn, I had not yet procured extra mason jars, but I decided I'd make do with what I had.  I couldn't miss the opportunity of all that free time!  A quick tip first - when you've decided to dye yarn yourself, I recommend winding your yarn into a hank as soon as you can.  Then, when you're ready to dye, all you have to do is get the yarn out and untwist that hank.  If you haven't already done this, and you don't have an easy way to unwind a skein, you're left spending your time unwinding and winding yarn.  Since I was already trying to be prepared to dye with Koolaid, I had already completed this step. :)

What you need:
Rubber gloves (I got mine in the pharmacy section at Hy-Vee)
Something to stir the solution (non-porous)
Tongs (to handle hot yarn)
Oven mitts or towel (to handle hot bowl or mason jars)
Old towel (for messes)
Newspaper or garbage bag (to lay under your ingredients to prevent dyeing your countertops!)
Yarn
Koolaid
White Vinegar (for Jell-O)
Salt (for Jell-O)
Microwaveable mixing bowl or mason jars

First, I untwisted my hank of yarn and set it in a solution of water with a tiny bit of dishsoap (I used a bit of regular old Dawn.).  My yarn soaked for about 20 minutes. 
Wear gloves.  Although stained fingers might be pretty, I didn't want to go to work having to explain why I was red & blue. While my yarn was soaking, I prepared the Koolaid.  I took one mason jar for each color I wanted to dye (since I only had 2 jars, I knew I would only be using 2 colors!), and poured the Koolaid powder into each jar.  As far as the ratio between the amount of Koolaid vs. the amount of yarn, just know that the more Koolaid, the darker the yarn.  The amount of water is less important than the Koolaid/yarn ratio. 
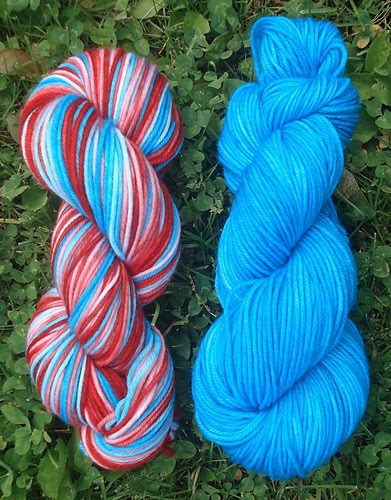
I used 2 packets of Berry Blue in one jar
and 2 packets of Strawberry in the other jar.  I added just enough HOT water to dissolve the Koolaid. 
I then added the yarn - half in each jar, and added enough water to cover the yarn.  There was some yarn that would not be covered by water since I was using 2 jars.  After I had added the extra water, I dipped this yarn into the solution to get a lighter color (half in blue, half in red) and made sure it was plenty wet when I put it in the microwave. 
Putting everything in the microwave, I nuked it for 2 minutes.  Then, using oven mitts, I removed the hot containers from the microwave, and let them sit for 2 minutes to cool.  At this point, using the handle of a spatula, I moved the yarn around in the jar, checking to see how clear the liquid was.  Using tongs since the yarn was hot, I dipped the portion not submerged in water in each of the corresponding liquids - making sure the yarn remained wet while heating.   Repeat this step until the water in the jar is clear (or at least void of color - sometimes, depending on the Koolaid used, the water will be cloudy).  This means the dye has exhausted and has been absorbed by the yarn.  (Item to note: Koolaid already contains citric acid so it is not necessary to add a setting agent like extra citric acid or white vinegar.  Some people even use clear Koolaid as their setting agent.) 

At this point, I let my yarn cool, and then rinsed it in another water bath - making sure the water was the same temperature as the yarn.  If you use water that is too cold, it could shock the yarn into felting (or so I've heard - I was using superwash merino because it's easy to dye and you cannot felt it).  After rinsing well, I gently squeezed all the water out of the yarn (you could also wrap it in a towel and smoosh). 
Then, hang to dry.  After my yarn is mostly dry, I like to put it in the dryer for just a couple minutes to get the remainder of the moisture out (this is mostly because I'm impatient and don't like waiting for the final results!). 
I wasn't entirely pleased with the amount of color at this point so I overdyed the yarn (still wet and using the same method as above) with 1 packet Ice Blue Raspberry and 1 packet Black Cherry.  This gave a nice variagated color in the end.

My favorite part is rewinding the yarn into a nice hank to see how the colors look against one another. So pretty!
This was so simple and so quick.  I could have easily done several more skeins of yarn.

I also dyed a hank of yarn using Berry Blue Jell-O.  If I were to use it again, I might be more conscious of how much yarn/Jell-O I had.  I had about 3.5 oz of yarn and the resulting color was a very pretty, but very light blue.  By adding food coloring,  I was able to darken the color. (Sorry, I don't have pictures this time!)

This time I did not pre-soak my yarn.  I added 5 cups water, 1 cup white vinegar, and 1 teaspoon salt (the salt helps slow the absorption of dye so you have a more even result - if you want some variation in the color, you could skip the salt) to a microwaveable, non-pourous bowl.  Then I added the Jell-O and stirred until all the gelatin was dissolved.  Be patient with this step, you don't want clumps on your yarn!

I submerged my yarn in the dye solution, making sure it was all covered, using my spatula handle to mix it around a bit.  (My understanding is that if you have wool that could felt, it is important to handle the yarn as little as possible to prevent any possible felting. Again,  I was using superwash wool). 

I then nuked my bowl of yarn & dye for 2 minutes, let it cool for 2 minutes.  Repeat 3 times. Each time, checking to see how clear the water was. 

When this was complete, I rinsed my yarn.  Hang to dry.  I had let mine dry for about 5 minutes when I decided I wanted it darker.  I went back to my bowl, adding water, white vinegar, and this time, blue food coloring from McCormick's neon pack.  I don't know how many drops I added, I just kept adding dye, soaking the yarn, and heating/cooling until I liked the final result.  I've heard that blue is a bit difficult in that it takes longer to exhaust the dye. I've also heard that it takes more vinegar or citric acid to really set well.  When I use food coloring again, I will let the yarn sit in the dye bath, covered, overnight to let the yarn exhaust the dye while it cools. 

After it was cool, I rinsed in lukewarm water (same temperature as the yarn) until the water ran clear.  Hang to dry.  I was very pleased with the resulting color.  My original Jell-O color was very even, but I didn't use salt with the food coloring and so I do have a little variation in the blue.  I like it!
I am very happy with the results and would use these methods again!